
Accessing AR-Drone 2.0 Video Feed
Background
We all have our own Moby Dick. My elusive white whale was connecting to the camera of this drone I got to play with in coding bootcamp. No one had been able to do it. Sure, you could download the app that lets you fly and record with the drone, but I wanted to tap directly into the video feed. After scouring the internet for a few hours I found a clue and from there was able to get the right tools and stream that feed to my computer. Here’s how you do it, step by step.
1. Install FFmpeg with homebrew
here’s a link to a walk through:
Installing FFmpeg
Or you can just run this command if you have brew installed.
$ brew install ffmpeg --with-ffplay
2. Connect to your drone
Connect to your drone’s wifi and go to the following address in your browser:
http://192.168.1.1:5555/
If your browser starts downloading something, you’re doing it right. That’s the video. It isn’t usable to you yet but that’s the stream you’re trying to connect to.
Cancel the download.
3. Use ffmpeg to target that feed
Here’s where the two meet. FFmpeg can make sense of the video feed and actually play it back for you with the FFplay tool you selected in the install. To see the feed just type in your terminal:
$ ffplay http://192.168.1.1:5555
You should get some messages and then a window will pop open with the drone’s front camera feed. I’d imagine the other camera has a different port number but I’ll leave that for you to decide.
How to Use Exercism.io
Making a Ruby Gem Beginners Guide
Ruby Gems are one of the most innovative ways to distribute software ever created. They allow people to package their code in a neat and distributable shiny little suit case and show it off to the world using rubygems.org. Gems have been used to package all types of tools, from Rails plug-ins to OS X operating system patches in order to help the Java Developer’s Kit run. Gems have many purposes but all have a few things in common: They are written in ruby and are packaged in a certain way so they can be easily shared on RubyGems.org
Why Make a Gem?
The notion to create a gem will usually present itself to you. If you find yourself repeating the same process over and over again, all while thinking, “I bet there are more people dealing with this than just me”, you may have a prime situation for a gem.
With you now, I’ll be creating a gem that certainly has a real world practical application. Like lots of municipalities, the city of Chicago provides some data end-points that return JSON data on all sorts of things. We’re going to create a gem that will handle that communication to the JSON end-point for you and simply return more manageable PORO’s (Plain Old Ruby Object).
https://data.cityofchicago.org/resource/xzkq-xp2w.json
When you visit this url in your browser, you’ll predictably get a JSON response consisting of a few thousand public employees. If you have a JSON formatter installed in your browser, you’ll see something like this:
[
  {
    job_titles: "WATER RATE TAKER",
    department: "WATER MGMNT",
    name: "AARON, ELVIA J",
    employee_annual_salary: "90744.00"
  },
 ...
]
This is obviously totally useful information and I find it impressive that it is so easily available to me. But what if I’m writing a Rails app and I don’t want have to worry about working with all the JSON conversion right in my app? How many times have you searched for a gem that accomplishes a small task for you that people need a thousand times a day?
Getting Started
You’ll probably want to have a rubygems.org account so start by going there and signing up. You don’t need one to create gems locally on your own machine but it doesn’t hurt to get a non-working version of your gem up early so you can protect your gem’s name which is first come-first serve like url’s. While you’re there, make sure your desired gem name isn’t taken by searching for it. If it is, just go back to the drawing board and come up with a modification. There is nothing more frustrating than getting yourself into naming problems on purpose. Once you have a name you like that isn’t taken, use your terminal to navigate to the drive location you want your gem’s folder structure to reside in for development purposes.
We’ll be using the bundler gem to create our new gem structure but it isn’t the only game in town. I can’t tell you what they are, but I’ve heard they exist.
~ $ bundle gem sample_gem

### then you should see this code

Creating gem 'sample_gem'...
      create  sample_gem/Gemfile
      create  sample_gem/.gitignore
      create  sample_gem/lib/sample_gem.rb
      create  sample_gem/lib/sample_gem/version.rb
      create  sample_gem/sample_gem.gemspec
      create  sample_gem/Rakefile
      create  sample_gem/README.md
      create  sample_gem/bin/console
      create  sample_gem/bin/setup
      create  sample_gem/.travis.yml
      create  sample_gem/.rspec
      create  sample_gem/spec/spec_helper.rb
      create  sample_gem/spec/sample_gem_spec.rb
Initializing git repo in /Users/jamesgates/sample_gem  #no need to run git init
All that happened here is that bundler created some files for you and put them into a nice new folder called “sample_gem” and initialized a git repo for you automatically. Move to that directory.
~ $ cd sample_gem
~ sample_gem $ subl .    #only works if you have a sublime shortcut set up.
Open this file path with your favorite text editor you’re ready to hack away. There are 4 key files in this tree that every beginner should know about and look at.
- sample_gem.gemspec
- lib/sample_gem.rb
- lib/sample_gem/version.rb
- README.md
/sample_gem.gemspec
this is your gem’s configuration file. A lot of settings and behaviors are configured here.
# coding: utf-8
lib = File.expand_path('../lib', __FILE__)
$LOAD_PATH.unshift(lib) unless $LOAD_PATH.include?(lib)
require 'sample_gem/version'

Gem::Specification.new do |spec|
  spec.name          = "sample_gem"
  spec.version       = SampleGem::VERSION
  spec.authors       = ["gatorjuice"]
  spec.email         = ["name@email.com"]

  spec.summary       = %q{TODO: Write a short summary, because Rubygems requires one.}
  spec.description   = %q{TODO: Write a longer description or delete this line.}
  spec.homepage      = "TODO: Put your gem's website or public repo URL here."

  # Prevent pushing this gem to RubyGems.org by setting 'allowed_push_host', or
  # delete this section to allow pushing this gem to any host.
  if spec.respond_to?(:metadata)
    spec.metadata['allowed_push_host'] = "TODO: Set to 'http://mygemserver.com'"
  else
    raise "RubyGems 2.0 or newer is required to protect against public gem pushes."
  end

  spec.files         = `git ls-files -z`.split("\x0").reject { |f| f.match(%r{^(test|spec|features)/}) }
  spec.bindir        = "exe"
  spec.executables   = spec.files.grep(%r{^exe/}) { |f| File.basename(f) }
  spec.require_paths = ["lib"]

  spec.add_development_dependency "bundler", "~> 1.9"
  spec.add_development_dependency "rake", "~> 10.0"
end
Lines 12, 13, and 14 all the term “TODO” in them, do you see that? You’ll need to eliminate the TODO’s in order for your eventual “rake install” task to run. If that syntax surrounding it looks strange, that perfectly understandable, especially if you’re new to Ruby. It’s just a different way of writing a string in Ruby and it’s actually pretty cool. Without getting too far into it,
%q{Im treated like a single quote string, dont try to interpolate.}
%Q{Im treated like a double quote string, interpolate away.}
Replace those strings with the pertinent information and move on with your life
# coding: utf-8
lib = File.expand_path('../lib', __FILE__)
$LOAD_PATH.unshift(lib) unless $LOAD_PATH.include?(lib)
require 'sample_gem/version'

Gem::Specification.new do |spec|
  spec.name          = "sample_gem"
  spec.version       = SampleGem::VERSION
  spec.authors       = ["gatorjuice"]
  spec.email         = ["name@email.com"]

  spec.summary       = %q{Ruby Wrapper for Chicago Employees}
  spec.description   = %q{Creates ruby objects from the Chicago Employees API end point.}
  spec.homepage      = "https://github.com/gatorjuice/sample_gem"

  # Prevent pushing this gem to RubyGems.org by setting 'allowed_push_host', or
  # delete this section to allow pushing this gem to any host.
  if spec.respond_to?(:metadata)
    spec.metadata['allowed_push_host'] = "TODO: Set to 'http://mygemserver.com'"
  else
    raise "RubyGems 2.0 or newer is required to protect against public gem pushes."
  end

  spec.files         = `git ls-files -z`.split("\x0").reject { |f| f.match(%r{^(test|spec|features)/}) }
  spec.bindir        = "exe"
  spec.executables   = spec.files.grep(%r{^exe/}) { |f| File.basename(f) }
  spec.require_paths = ["lib"]

  spec.add_development_dependency "bundler", "~> 1.9"
  spec.add_development_dependency "rake", "~> 10.0"
  spec.add_dependency "unirest", "~> 1.1.2"
end
Line 31 is essentially like adding a gem to a Rails app’s gemfile. We still need to “require” the gem in our working code but this establishes a dependency (notice not specified to development like the two above it are) upon that gem. Unirest is a gem that handles http requests. It’s really, really, really, really, really, really a good idea to include your gem’s version number. Just check which version you’re using locally and add it in. You can look that info up my running this command:
~ sample_gem $ gem list --local
/lib/sample_gem.rb
This is the heart of your gem. When a gem is “required” this is the file that is moved into the load path. Let’s take a closer look…
require "sample_gem/version"

module SampleGem
  # Your code goes here...
end
The first thing you might notice is that we are going to wrap our code with a module. This is purely a module being used as a namespace. It’s important to namespace your gem like this so that your classes contained within can be referenced explicitly as to not cause a naming conflict with a class in your application, or some other gem you are relying upon. Here comes the time that we should remember to “require” any gems we need before we get to deep and start banging our heads on the wall shoutsking, “WHY ISN’T MY UNIREST CALL WORKING?”
require "sample_gem/version"
require "unirest"

module SampleGem
  # Your code goes here...
end
Now we can start writing some code. We want our users to be able to run
employees = SampleGem::Employee.all
And have an array of ruby objects returned to them, each one a separate Chicago employee. Let’s start with that code:
require "sample_gem/version"
require "unirest"

module SampleGem
  class Employee
    def self.all
      ruby_data = []
      bulk_data = Unirest.get(
        "https://data.cityofchicago.org/resource/xzkq-xp2w.json"
      ).body
      bulk_data.each do |employee|
        ruby_data << employee
      end
      ruby_data
    end
  end
end
This code will work, but you may have noticed a problem. What this method is returning is an array but it’s not an array of ruby objects, it’s an array of JSON objects. If we could turn each JSON object into a ruby object it will give us the ability to work more with the values and fine tune our user experience. Let’s create a way to do that.
require "sample_gem/version"
require "unirest"

module SampleGem
  class Employee
    attr_reader :job_title, :department, :name, :salary, :first_name, :last_name

    def initialize(input_options)
      @job_title = input_options["job_titles"]
      @department = input_options["department"]
      @name = input_options["name"]
      @salary = input_options["employee_annual_salary"].to_i
      @first_name = @name.split(",  ")[1]
      @last_name = @name.split(",  ")[0]
    end

    def self.all
      Unirest.get("https://data.cityofchicago.org/resource/xzkq-xp2w.json")
             .body
             .map { |employee_object| Employee.new(employee_object) }
    end
  end
end
Now we’ll get an array of instantiated Employees to work with and we gave the new ruby object attr_reader access otherwise the info is kind of useless. (I also got out self.all method down to a one liner.) This also allows us to play with the specific data if we don’t like the format, for example we could convert the string based salary into an integer or eliminate the extra space between the last and first names. Hell, we could separate the last and first names and push out two new attributes – @first_name and @last_name or create a method that calculates a weekly salary – @weely_salary.
/lib/sample_gem/version.rb
This file is where you specify your version. It’s especially important for developers to update this number before pushing updates to their gem online. If you alter your gem and push up to RubyGems.org with a change that breaks functionality for users of your gem, you’ll lose street cred and be labeled a — I can’t even say it.
ServiceWeb Preview
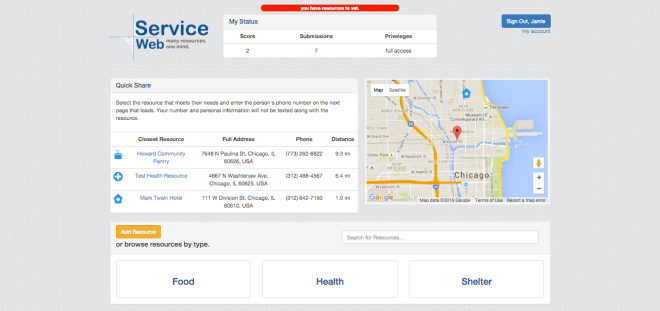
It’s almost there.
You’re on the train. A person addresses the car.
“I’m homeless. If anyone has a dollar or two, I just want to get something to eat. Please help. God Bless.”
I can never bring myself to hand over money because in my heart of hearts, I do not believe that money will be used for the reasons stated. This doesn’t however eliminate my responsibility to help.
I’ve struggled with this feeling for a long time. ServiceWeb is my attempt to leveraging actual resources used by social workers on a daily basis and their unique perspective to help eradicate the need to help people in need.
If you care about the immediacy of a fellow person’s situation, you can look up nearby resources quickly and share them without texting and thereby divulging your own cell number and without simply handing over money. You can provide help in a real and meaningful way, by sharing professionally submitted and vetted resources.
more to come
Relationships, a quick how-to
In the world of SQL databases, relationships between two or more tables — joins, as many refer to them — are some of the hardest things to get your head around in all of web app programming. Even veteran Rails programmers struggle when they start a new app and begin thinking about what belongs_to what? And what has_many of huh? SQL tables are the heads of a hydra, and like all good hydras, you have to attack every head at once. This means employing well thought-out, omnilateral approach before that bad boy gets out of control on you. Before you even start writing any code you should…
Prepare
Your brain, unless you’re special (you aren’t), is not designed to think in the same terms that computers can. You simply cannot do a good job of negotiating what tables you will need, in your mind all at once.
What are tables? For us, tables are the 2-dimensional objects that hold data at a fixed reference point, an x-axis and y-axis. For our purposes in development, we often need to ‘relate’ one table to another. As a result, your tables need an index, which customarily sits at the left most edge and is made of unique and sequential integers. Well hell, where have you seen that every day of your life?
That’s right! Excel.
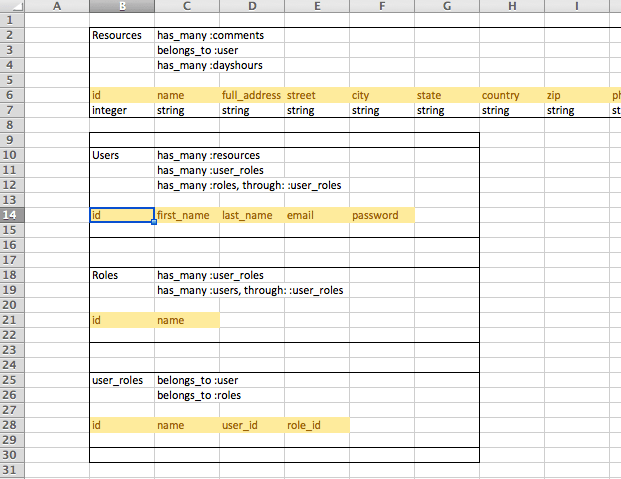
Bust out your Excel (or numbers, or sheets) and start using that thing for staging. Having your own personally created reference tables to look back to can be life saving. In this project I’m creating a table of community resources, one for my users, one for my roles as a user, and a join table to link my users to roles.
This example is taken from a real live project I’m working on!
Isn’t that exciting!?
I’m using excel to help outline the SQL tables in my project. I am not a punk for doing this. I’m a good boy for doing it. You will waste many hours backtracking your app if you don’t go into your dev with clear tables in mind.
Now, I’m not only keeping tabs on my table columns. I am also making notes about the relationship between the tables. When my program adds a new Resource row, I can think of it “belonging to” the user that created it. In my design, I want users to be able to comment on a resource so I know that a resource will “have many” comments. For our sake, in the following code we’ll be looking at how rails uses the #belongs_to and #has_many methods to make quick work of complicated SQL jargon.
class UserRole # this is the join table or "through" table


  belongs_to :user
  belongs_to :role

 # most of class omitted

end
---------------------------------
class Resource

  has_many :comments
  belongs_to :user


 # most of class omitted

end
---------------------------------
class User

  has_many :resources
  has_many :user_roles
  has_many :roles, through: :user_roles


  # most of class omitted

end
---------------------------------
class Role

  has_many :user_roles
  has_many :users, through: :user_roles


  # most of class omitted

end
Simple < has_many : belongs_to > relationships
In our models above, our simplest-to-think-about relationships are the “user has many resources” and “resource has many comments” relationships, along with their counterparts, “resource belongs to user” and “comment belongs to resource”. When your models fit this simplistic familiarity with one another, creating joins in your code is as easy as saying,
user = User.find_by(id: 1)
user.resources
=> (all resources that belong to user with id = 1)

or

resource = Resource.find_by(:name => "country pantry")
resource.user
=> (the user object that the resource belongs to)
has_many, through relationships
Our users and roles relationships are a bit more tricky, but our calls will be similar to the ones above if setup properly. Join tables are used when one thing can have many of the other and visa versa. Here are the two models once again.
class User

  has_many :resources
  has_many :user_roles
  has_many :roles, through: :user_roles


 # most of class omitted

end
---------------------------------
class Role

 has_many :user_roles
 has_many :users, through: :user_roles


 # most of class omitted

end
Assuming we have a user or role variable instantiated we can now just call…
user.roles
=> (all the roles that user has)

and

role.users
=> (all of the users under that role)
This is all magically generated for you by rails using Active Record performing database calls. Active Record literally creates SQL code for the database you’re using (even Mongo and NoSQL code assuming your gem dependencies are installed)
Project Euler #501
Aside from taking so long to run in ruby, this problem is fairly easy to crack using a brute-force testing strategy. I’m curious if anyone else has a faster way or could post a better example in a faster language than ruby.
def f(number)

  testing_range = (1..number)

  numbers_with_8_divisors = []

  testing_range.each do |n|
    divisors = []
    (1..n).each do |x|
      divisors << x if n%x == 0
    end
    numbers_with_8_divisors << n if divisors.length == 8
  end
  numbers_with_8_divisors.length

end

p f(10**12)
=> "too long to wait for, but this works lolz"
The Random 7
No, it’s not the most recently leaked Tarantino Screenplay. I’m of course referring to a challenging conundrum my bootcamp cohort friend showed to me. The problem is a little lax on wording but I’ll try to interpret it the best I can. Simply put, the challenge says,
“Given a function rand5(), implement rand7()”
By rand5() they mean a random integer between 1 and 5, inclusive. I completed this task using ruby, so I’ll present the necessary code to complete using THEIR wording.
rand(5) won’t work because it includes ‘0’.
When I first started thinking about this problem, I was confused as to what I would need to do because it seems impossible that given an assortment of 5 possible random outcomes, one could generate a random number between 1 and 7. I started considering strange possibilities, but the answer was right under my nose. Using the .sample method on an array of arrays. See below.
rand7 = [
 [1, 2, 3, 4, 5, 6, 7],
 [1, 2, 3, 4, 5, 6, 7],
 [1, 2, 3, 4, 5, 6, 7],
 [1, 2, 3, 4, 5, 6, 7],
 [1, 2, 3, 4, 5, 6, 7]
]

100.times { puts rand7[rand((1..5))-1].sample }
By utilizing the rand5() concept to randomize an array’s index, you can just use sample to call a random 1-7.
I also wanted to do the same using the true ruby method rand(5) => rand(7), so that’s below:
rand7 = [
 [0, 1, 2, 3, 4, 5, 6],
 [0, 1, 2, 3, 4, 5, 6],
 [0, 1, 2, 3, 4, 5, 6],
 [0, 1, 2, 3, 4, 5, 6],
 [0, 1, 2, 3, 4, 5, 6]
]

100.times { puts rand7[rand(5)].sample }
I realize this way may seem easier than people have made the problem, but if I’m understanding it correctly, it doesn’t need to be that hard.
Rails: Passing Parameters to your page; Using user input
If you’re like me, you comprehend the gets.chomp methods as a way to gather information from your user. Rather fortunately however, the command line isn’t really available to your user and they probably wouldn’t know what to do with it if it were. We are accustomed to clicking links and the application rendering a new view with your item featured. Etsy would be quite clunky if you could never view an item you like by itself. Sorting how rails accomplishes this is a trickier topic than most tutorial basics show you, but at the same time, the only other advanced tutorials tend to be overly wordy and convoluted.
Lets pick apart a popular way of getting user defined parameters and using them accordingly. Lets say we have a run-of-the-mill eCommerce rails app.
# we have a landing route to the list of all products
# when a user inputs <domain>/home into their browser...

# config/routes.rb
get '/home' => 'products#show_all

# when the browser goes to the /home url,
 the products controller starts the show_all method.

# this gets triggered in /app/controllers/products_controller.rb
class ProductsController < ......

    def show_all
         @products = Product.all
    end

end
At this point, @products is a variable made available to us on the show_all.html.erb view. It contains all the objects of class Product and can be iterated and manipulated accordingly. But what if you want to see a particular item, say, the Product with ID #2 in the database?
# to see this Product with ID#2 the user needs to pass
 Parameters along with the get request

# this time the user is going to type into their browsers
 address bar: "<domain>/products/2"

#config/routes.rb showing previous path and NEW PATH needed:
get '/home' => 'products#show_all
get '/products/:item_number' => 'products#show_product'

# now we need a new method to make use of the route defined above
class ProductsController < ......
    def show_all
        @products = Product.all
    end

    # this is when we use params to pass the variable
 in the route (:id) to the controller

    def show_product
       @product = Product.find_by(id: params[:item_number])
    end
end
Now @product is available to your view. It will be unique because you used it’s database id to look it up. This can be trickier when searching by name or other non unique attributes, but with the default :id it’s a sure fire thing. Hopefully this is just simple and basic enough to help you wrap your head around the concept and get it working. Don’t worry about feature functionality at this point. It’s important to know these mid level skill things and how they work, even if a user would never operate your app this way.
A New Way to Compare Hashes in Ruby 2.3
I must admit, this is pretty cool. Maybe not the most amazing thing you’ve ever heard of, but still, moves like this perfectly demonstrate the high functioning hive-mind of the ruby community. This new way to compare hashes was pretty sweet to me, so I wanted to share it with you.
#the old way of comparing hashes, which doesn't make sense.
{ a: 1, b: 2 }.include?({a: 1})
=> false
That evaluates to false because Hash#include can’t check for a key value pair, it can only check if the key exists.
#new to ruby 2.3
{ a: 1, b: 2 } >= { a: 1 }
=> true

{ a: 1, b: 2 } >= { a: 2 }
=> false
The hash on the top left is larger and includes the smaller hash on the right, so it evaluates to true. The one beneath is larger but doesn’t contain the key value pair on it’s right.
Have at it!
